

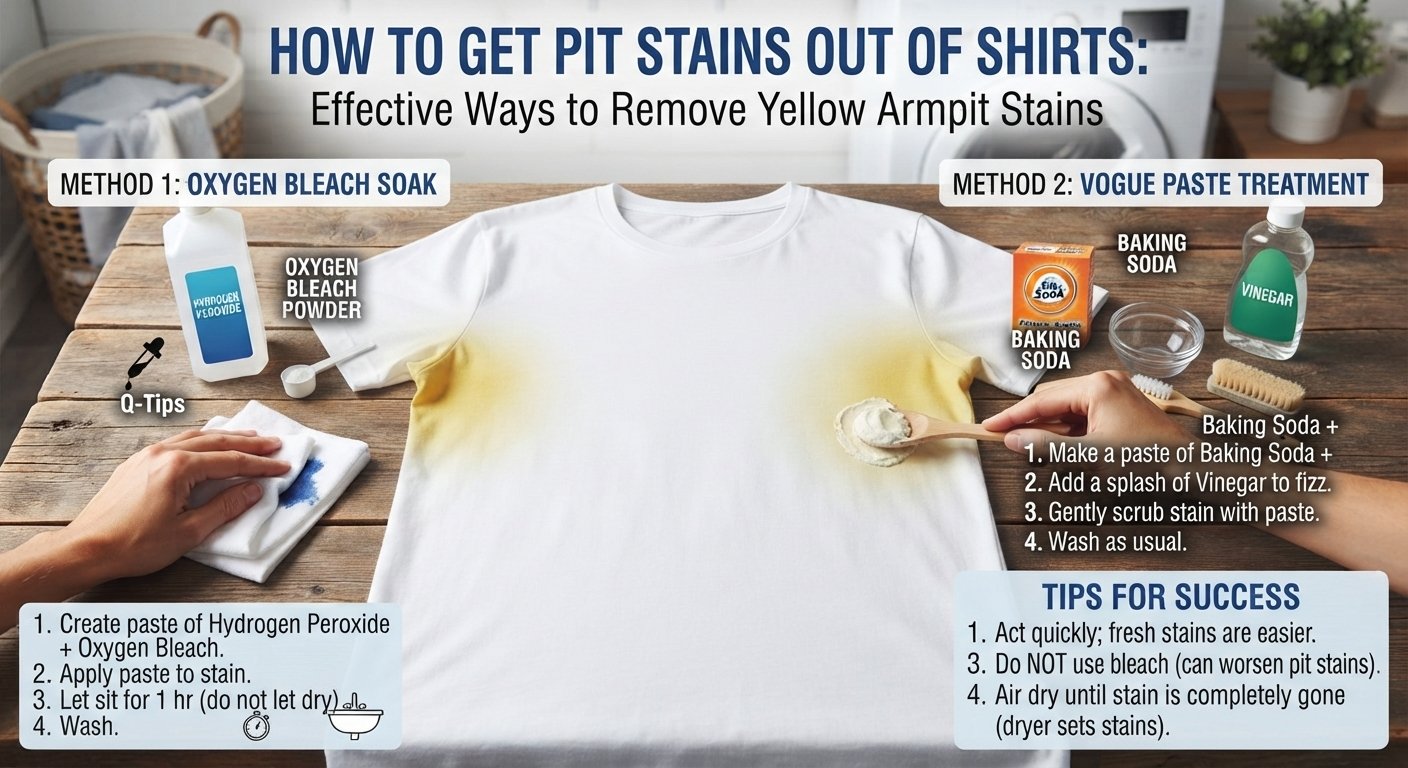
Underarm stains can make an otherwise clean shirt look old, especially when yellow or gray discoloration develops around the armpits. If you are trying to figure out how to get pit stains out of shirts, the key is to treat the residue rather than simply washing the garment over and over. Sweat itself is mostly water and does not always leave a strong stain. The discoloration often develops when sweat mixes with deodorant or antiperspirant ingredients, body oils, and residue that remains in the fabric.
A new stain is usually less of a problem than one that has gone through several washing and drying cycles. You’re not entirely out of hope for an old shirt, either; the solution depends on the fabric, the age of the stain and whether it’s yellow, white, gray and/or smelly. This guide covers effective pretreatments, managing different kinds of fabric, what not to do if you don’t want to increase the risk of stain, and how to avoid new armpit stains.
What Causes Pit Stains on Shirts?
Pit stains are a sort of discolouration which occurs around the underarms of clothing. On white shirts they can take on the form of yellowish marks, on colored clothing darker patches and on anything they may appear as a stiff slightly waxy film after a while.
While perspiration can be a cause there is not actually necessarily a lot ofit there at all. The underarms are areas of a clothing which come into very regular contact with deodorants and antiperspirants. Some antiperspirants will include ingredients based on aluminum to minimise perspiration and when combined with body odors, sweat and detergent may create some of the visible stain.
The particular material being used is also a contributing factor to different clothing developing pit stains to varying degrees. For example a cotton material may readily soak up perspiration and deodorant build-up through its fibres and whereas synthetic materials such as polyester do not. Many clothes will be made up of a blend material but will exhibit properties of some of each.
Washing can only really help a limited extent. Over time the effects of perspiration, deodorants and even soap building up in this area of the material, especially when a garment is worn multiple times and can not easily be aired can prove to be almost impossible to remove if only normal washing cycles and temperatures are used. For this reason using something to treat the underarm area can be effective as it will help to prevent the problems occuring in the first place or be specifically targeted to remove them at a targeted point within the washing process.
Why Do Underarm Stains Turn Yellow?
Yellow underarm marks are most prevalent in white or very light colored tops. The marks deepen with time due to the continual depositing and breaking down of materials-sweat, body oil, product buildup from anti-perspirants, washing.
Heat can affect the ease of stain removal; the dryer itself doesn’t normally produce the stain but it sets the mark in further.
How old the mark is also an element; a new perspiration/deodorant stain may respond quite readily to minimal pretreatment. The much-used and washed top might need more than one treatment cycle.
Type of deodorant is relevant; some products are more prone to residue than others, particularly if excessive amounts are used and/or clothing is donned prior to the product evaporating.
If the yellow stain continuously forms in the exact same spot, fabric treatment is only part of the solution; decreasing product buildup and permitting a reasonable drying time of the underarm product prior to dressing is key.
How to Get Pit Stains Out of Shirts: Start With the Fabric
Before using any of the stain-remover recommendations, be sure to check the garment’s care label instructions to make sure the treatment is appropriate for the fabric.
Not all fabrics can or should be treated identically.
Cotton t-shirts often withstand the same type of conventional pretreatment methods that a delicates may not. A wash will need different stain-remover-treatment strategies than a linen or particularly delicate t-shirt will. Woolen t-shirts will tolerate most of these treatments very well, but those made of silk, rayon, or some custom cloths will likely not withstand harsh chemicals or aggressive scrubbing.
Also determine the t-shirt’s color: a stain-remover treatment safe for an off-white cotton shirt may not suitable, or in fact ruin, a colored t-shirt.
Whenever unsure, test out a product on a small area that has not been seen. Apply a bit, give it the prescribed wait time, and examine the fibers for color loss or damage.
Do not presume a more powerful clean will always equate to the most successful one. Stain removing often just requires sustained appropriate action, as opposed to the single most aggressive solution in one’s arsenal.
A Simple Pretreatment Method for Fresh Stains
Treat the new underarm marks as soon as possible, before they have a chance to set in.
First rinse or wet the stained underarm area with cool to warm (not hot) water. Be careful not to wash with very hot water initially on unfamiliar stains.
Apply some liquid laundry detergent directly to the underarm of the stained garment. Work it into the fabric with your fingers or a soft bristle brush, making sure to spread the detergent through the fibers.
Allow it to sit in the underarms for several minutes following the laundry detergent instructions. Wash with the hottest water acceptable for the garment according to the care label.
Air dry, or at the very least, do not put into the dryer without checking first. You should re-treat if necessary before drying.
This last step seems simple enough but often forgotten. Drying will likely set in the stain, rendering it more difficult to remove, so once again make sure it worked before you dry.
Using a Baking Soda Paste for Stubborn Buildup
Baking soda can be found in most homes to help get rid of tough, sticky residue that’s on clothes. It mixes easily with a little water for a paste, then applied to the stain.
If a t-shirt can be washed and take being scrubbed. After applying the paste on the stain, and then lightly rub it in. Depending on the garment, and how sticky it is to residue to linger, rinse and wash as usual.
If the paste is put on an article of clothing it isn’t always better to leave it on there for hours or over night! The longer any pasty substance stays in an item can damage some dyes and fragile materials.
Baking soda is often ideal when areas on the shirt such as the underarm section is stiff from residue or grime. Baking soda should only come to mind as a definite answer for a tough yellowing-discoloring for residue and grime, not every yellow stain. Yellowing that’s set-in could take several treatments, or should be treated using commercial cleaning products or stain removers that were made for dirty clothes and tough stains.
Try Hydrogen Peroxide Carefully on Suitable White Fabrics
Hydrogen Peroxide can be found in some stain treatment components and is safe for light colored or white washable clothing. This product has oxidative characteristics and has the ability to break down organic type discolorations.
It does contain effects that will impact dyes and some fabrics so it is an ingredient which must be used with caution. Do not try it on dark colored or vibrantly colored articles of clothing unless it is absolutely verified as being safe. Look at the laundry instructions or test on a hidden area first.
Commercially available, oxygen-based laundry pretreatment may be an easier option because oxygen-based stain removers are designed for laundry and typically include clear concentration and application instructions.Do not randomly add and mix cleaning products! Avoid mixing various stain removers just because each ingredient may appear effective on its own. Many chemical components will interact in unexpected or damage the fabric.
If the shirt is an expensive or delicate article of clothing, following the laundry directions by using an appropriate stain remover for the fabric is generally safer than trial and error.
How to Remove Pit Stains From Colored Shirts
Colored clothing should be treated a bit more carefully since the purpose here is to remove the deposit, not the color. Begin by applying a mild liquid laundry detergent or an item labeled as safe to use on colors to the areas on the shirt from which the material needs to be removed and gently massage the areas. After allowing the product to set according to package instructions, simply launder as usual, repeating the process if the area has been previously treated for stains or has had the same treatment over a prolonged period.
Don’t use chlorine bleach on your colored shirts unless the clothing item explicitly states that it is safe for this product because chlorine can sometimes alter the color more permanently than a yellow stain may be able to, and it is very capable of weakening many fabrics.
With darker colored shirts, white residue may be the concern more so than yellow material, and that could only be on the surface or embedded, and simply pretreating and launder would also be enough to solve it then. Always double check the clothing item after washing and before placing it in the dryer, or if you discover the residue is still present then it will have to be reapplied and relaundered again in order to have any chance at removal because a heated dryer cycle has actually the potential to set it.
Dealing With Old, Set-In Underarm Stains
Older stains have been set. Each wash and dry cycle sets in additional residue that will become harder and harder to remove.
Do not try to tackle a stain with one very strong treatment, attempt the stain by attacking the residue a little bit at a time. Break down the buildup with a prewash, then work it in and let it sit per package directions before washing according to fabric care tag directions.
Repeat it if the improvement is significant enough but there’s still stain, two moderate attacks are sometimes better than one ferocious one. For an washable white cotton garment maybe try an oxygen based presoak or pre-wash treatment. Test that carefully following directions to make sure the fibers will tolerate such a strong treatment.
If the garment has been repeatedly dried with very high heat, some of the discoloration might not be possible to remedy. That doesn’t mean that continued cleaning attempts can’t help, but set reasonable expectations. One cause of apparent staining, even on a garment that has never been marked with anything else is that the fabric fibers may themselves be altered in color/texture. Complete removal of discoloration may then not be achievable.
What About the Smell That Comes With Pit Stains?
An underlying odor can continue to linger in armpits even though visible staining is no longer apparent. Sweat, natural body oils, microbes, residual from your deodorant, and buildup on fabric are common contributors. The odor isn’t eliminated with standard washing if it has already been deep in the fibers and worn a multitude of times without pretreatment.
When washing yourshirt carefullyfollowing the care labelInstructions and with an appropriate detergent, try pretreating the pit first to try and get rid of some of the buildup before running it in.
Don’t resort to covering the odor with more fragrant detergents or additions; fabric softener, scent boost ers, and other additions will simply add more build up to the shirt. At some point you might need to consider that your shirt’s fabric is filled with decades of built up residue and cannot be salvaged. This is more common with synthetic materials that hold odors very well.
Common Mistakes That Make Pit Stains Harder to Remove
Do not toss it directly into the hot clothes dryer before inspecting it, with the stain intact, to see if your previous actions were effective in its removal. Instead, take a peek once you see that tell-tale yellow on the underarms.
Don’t rub or scrub the stains aggressively. Instead of lifting the stain from the fibers, the scrubbing could damage them and lift the fibers, pushing unwanted dirt and residue into the fabric’s fibers instead.
Too much detergent is another wrong approach. While it seems to reason that using too much will guarantee a cleaner shirt, excessive amounts of product can actually lead to greater amounts of residue to build up in the fabric fibers over time.
Chlorine bleach may not be the cure it seems. On some white clothing items, it may very well make the yellow discoloration seem more pronounced, depending on the type of residue creating the color.
Mixing up chemicals and household cleaning products is a dangerous tactic. Your solution to unwanted stains should be neither an at-home chemistry experiment nor a way for you to start a fire. Stick to what is designed for your stain and for use on that particular fabric item.
Read the care instructions. Fabric construction as well as dyes and finishings have a lot to do with how it will react to stains.
How to Prevent New Underarm Stains
So while removing existing stains can definitely be helpful, it’s sometimes even more convenient to prevent stain build-up altogether.
Let your deodorant or antiperspirant dry in to skin before wearing your shirt. Using a whole lot of product on one spot generally does not offer any significantly enhanced benefits. In fact, you are only more apt to be creating thicker build-up.
Wash your shirts a reasonable amount of time after you’ve perspired heavily. Do not let moisture and body oils linger for too long.
Pretreat shirts with the same issue routinely. You don’t always need to wait until a yellow stain has become visually obvious; wiping it while the build-up is fresh may make future laundry loads less frustrating.
Take notice of product switching as well. Has your staining abruptly worsened after a deodorant or antiperspirant switch? If so, it may be the product that is responsible for the problem.
Wash the clothes appropriately! Don’t pack your washing machine too full of clothing. Be judicious with detergent usage. Select a cycle appropriate for the fabric and soil level in question.
When a Shirt May Not Be Salvageable
For most regular washes which have been stained under the arms in the usual manner, it is worthwhile attempting to treat them, but there are some points to consider:
Certain materials may been permanently stained, weakened or otherwise compromised rendering a stain remover ineffective in restoring its appearance and particularly elderly shirts that have been subject to a build-up of perspiration, chemicals, friction and high temperatures might fall into this category.
Light and or delicate washing procedures might mean an article is not suitable for robust home application – those requiring dry cleaning or with particularly delicate fabrics might well be better with a trip to a dry cleaner where an assessment of appropriate treatment methods can be carried out without “blind” treatment from the customer.
Cheap clothing worn during everyday use is at certain points better replaced than continuously treated for a heavily ingrained stain. Clothing that is particularly loved, expensive, is vintage or of a sentimental nature might be more cost-effective or practical to take to a professional service.
A Practical Routine for Better Results
For most washable shirts, a sensible stain-removal routine looks like this:
- Check the care label. Confirm that your chosen cleaning method is suitable for the material.
- Inspect the stain. Determine whether you are dealing with yellowing, white product buildup, odor, or a combination.
- Pretreat the underarm area. Use a suitable laundry detergent or fabric-safe stain remover.
- Work gently. Use your fingers or a soft brush rather than aggressive scrubbing.
- Allow the treatment to work. Follow the product’s recommended contact time.
- Wash normally. Use the appropriate temperature and cycle for the garment.
- Inspect before drying. If the mark remains, repeat the treatment.
- Dry only after improvement. This reduces the chance of setting remaining discoloration with heat.
The process may take more than one attempt for an old stain, so following practical laundry stain removal tips can help improve results without damaging the shirt.
The objective is steady improvement without damaging the shirt.
Final Takeaway
Learning how to get pit stains out of shirts starts with understanding that underarm discoloration is often a combination of sweat, body oils, deodorant or antiperspirant residue, and repeated laundering. Fresh marks are usually easier to treat, while older stains may require several gentle treatments. Liquid laundry detergent is a useful starting point, while baking soda or an appropriate oxygen-based product may help with stubborn buildup on compatible fabrics.
Always check the care label, test unfamiliar treatments on hidden areas, and inspect the shirt before putting it in the dryer. Avoid aggressive scrubbing, unnecessary bleach, and mixtures of household chemicals. With prompt pretreatment and careful washing, many underarm stains can be reduced significantly, while prevention through proper product application and regular laundering can help keep them from returning.
Frequently Asked Questions
1.What causes pit stains on shirts?
Pit stains can develop when sweat mixes with deodorant or antiperspirant residue, body oils, and other substances left in the fabric. Repeated washing and drying can make the discoloration more noticeable and harder to remove.
2.How do you remove fresh pit stains from a shirt?
Dampen the stained area and apply a small amount of liquid laundry detergent. Gently work it into the fabric, let it sit according to the detergent’s instructions, and then wash the shirt according to its care label.
3.Can baking soda remove yellow underarm stains?
Baking soda can help loosen certain types of residue and buildup. It can be mixed with a little water to form a paste, applied gently to a compatible washable fabric, and rinsed before laundering.
4.How do you remove old, set-in pit stains?
Old stains may require repeated pretreatment rather than one aggressive cleaning session. A fabric-safe stain remover or oxygen-based laundry product may help on compatible garments. Always follow the product and care-label instructions.
5.Can you use bleach on yellow pit stains?
Chlorine bleach is not always the best choice for yellow underarm discoloration. It can sometimes make the appearance worse and may damage certain fabrics. Check the garment label and consider a product specifically designed for laundry stain removal.
6.Why do pit stains keep coming back?
Recurring stains can result from continued buildup of sweat, body oils, and deodorant or antiperspirant residue. Allowing products to dry before dressing, washing shirts regularly, and pretreating problem areas can help reduce recurring buildup.
7.Should I dry a shirt after treating a pit stain?
Inspect the shirt before putting it in the dryer. If the stain is still visible, treat and wash it again. Dryer heat can make remaining discoloration more difficult to remove.
8.Can pit stains be removed from colored shirts?
Yes, but colored clothing requires extra care. Use a stain remover labeled safe for colors and test it on an inconspicuous area first. Avoid treatments that could strip or alter the fabric’s dye.
Conclusion
Learning how to get pit stains out of shirts is easier when you treat the discoloration before it becomes deeply embedded in the fabric.Use a good detergent or fabric-safe stain remover and start gently, wash per care instructions. Baking soda or a color safe oxygen based laundry product could aid difficult stains but only where the fabric warrants it. Check the shirt out and ensure the stains are gone before you dry it as heat can set stains further, on older, more set stains, a few gentler applications will be more effective than one or two extreme ones.
Preventive action can also be highly effective; apply and then let the deodorant air dry (before putting the shirt on), wash sweaty shirts quickly, and work on those underarm stains before they have a chance to set.
After applying one of these many shirts can benefit greatly.